Flashing a Huawei GPON SFP Stick with Carlito Firmware
If you've ever wanted to take full control of your GPON SFP module, you're not alone. Huawei's GPON sticks (like the popular MA5671A) are well-known for their solid hardware, but their stock firmware can be a little restrictive. Fortunately, there’s an open-source alternative: Carlito firmware. In this guide, we’ll walk through flashing Carlito onto a Huawei GPON SFP stick — safely and step by step.
Note: This process involves interacting directly with the module’s bootloader. Proceed carefully, and make sure you understand each step before executing commands.
What You’ll Need
Before jumping in, gather the following:
- A Huawei GPON SFP stick, e.g. MA5671A.
- A SFP-to-TTL adapter and a USB-to-TTL adapter. This is crucial — it lets you access the serial console of your SFP module. These adapters convert the SFP’s 3.3V UART to USB so you can connect it to your computer.
- A macOS or Linux computer (Windows works too, but commands may vary slightly).
- The Carlito firmware binary file (
mtd2.bin). - A good dose of patience!
Step 1: Install Required Tools
We’ll be using picocom for the serial connection and lrzsz for YMODEM file transfers. On macOS, installing them is as simple as:
brew install -q picocom lrzszThese tools let you talk to the module over serial and send files directly to its memory.
Step 2: Prepare Your Workspace
Create a temporary directory to work in and download the Carlito image:
mkdir -p /tmp/carlito && cd /tmp/carlito

curl -o mtd2.bin https://ma5671a.s3.nl-ams.scw.cloud/mtd2.bin
This downloads the firmware in /tmp/carlito/mtd2.bin.
Step 3: Connect to the Serial Console
Plug your SFP-to-TTL adapter into the stick and your computer. Then, identify the serial port — on macOS it usually looks like /dev/tty.usbserial-XXXX.
Open a serial connection with:
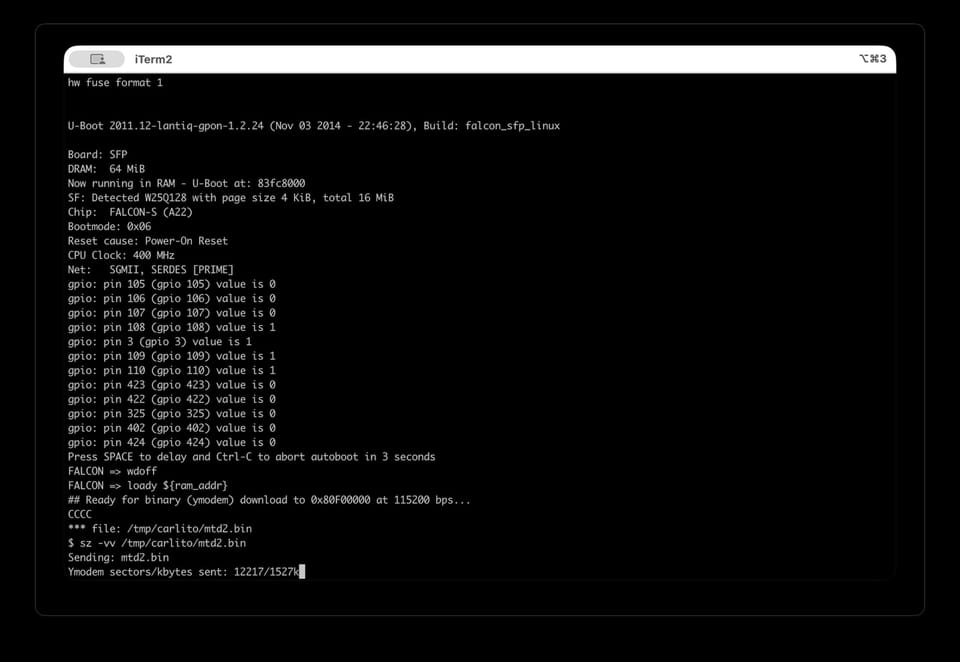
picocom -b 115200 --databits 8 --parity n --stopbits 1 --flow n /dev/tty.usbserial-XXXXIf all goes well, you’ll see a boot prompt from the Huawei stick.
Step 4: Load the Firmware into RAM
At the bootloader prompt, enter the following commands:
# switch watchdog off
wdoff

# load binary file over serial line (ymodem mode)
loady ${ram_addr}
The device will now wait for a file to be transferred using YMODEM. You’ll see some output like:
CCCCIn your terminal, press CTRL+A, then CTRL+S to send a file. Enter /tmp/carlito/mtd2.bin as file path and press Enter.
You should see the transfer progress. It might take 10-15min. Be patient 😅
Step 5: Flash the Firmware
Once the upload completes, print the file size to confirm:
printenv filesizeNow we’ll erase the old firmware and write the new one:
sf probe 0
sf erase ${kernel0_offs} +${filesize}
sf write ${ram_addr} ${kernel0_offs} ${filesize}
This process flashes Carlito into the correct partition of the SFP’s SPI flash.
Step 6: Commit and Reboot
To tell the bootloader to use the new firmware:
setenv committed_image 0
setenv image0_is_valid 1
saveenv
reset
Your Huawei GPON SFP will now reboot, running the Carlito firmware.
Step 7: Test Your New Firmware
Once the module boots up again, reconnect via serial or SSH (depending on your setup) and verify that it’s running Carlito. You should now have full access to the GPON parameters, system logs, and advanced configuration.
Troubleshooting Tips
- No serial output? Double-check your SFP-to-TTL adapter wiring. Make sure RX, TX, and GND are correctly connected.
- Transfer stuck at 'CCCC'? That means the module is waiting for the YMODEM transfer. Make sure you triggered the file send correctly.
- Device not rebooting? Re-run
saveenvbeforeresetto make sure the environment variables are stored.
Wrapping Up
Flashing Carlito onto a Huawei GPON stick gives you a lot more flexibility — especially if you’re integrating it into custom router setups or want deeper diagnostics. The process may look intimidating, but once you’ve done it once, it’s pretty straightforward.
If you plan to do this often, consider getting a dedicated SFP breakout board or SFP-to-USB programmer for easier access next time.
Happy flashing, and may your fiber connections always stay lit!
